


MediCenter v14.0 – Health Medical Clinic WordPress Theme
Original price was: ₹999.00.₹19.00Current price is: ₹19.00.
- Original product with the lowest price ever
- Downloaded from original authors
- Instant delivery with fast downloading speed
- 100% clean and tested code
- Product Version: MediCenter v14.0
- License: GPL
MediCenter – Health Medical Clinic WordPress Theme
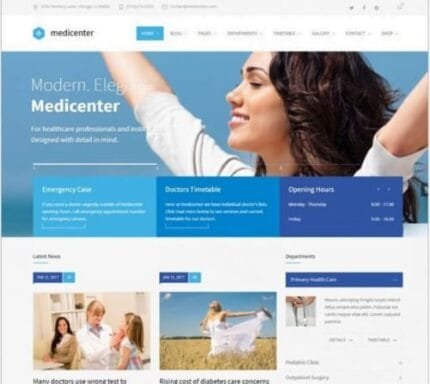
Dedicated to medical and health care institutions, clinics and hospitals, doctors, and everyone else involved in health services, Medicenter is the most popular and #1 selling medical WordPress Theme. For the effortless crafting of feature-rich medical industry websites. From dentistry and psychiatric practices to veterinarians, Medicenter has you covered.
Media centers can enhance clinics and hospitals, medical institutions, health care professionals, doctors, dentists, beauty, and wellness-related web pages.
Medcenter layout is responsive and retina-ready, polished to a professional degree of attention to detail. It uses both boxed and full-width style and unlimited color options to customize with a color scheme manager. Medcenter comes with premium slider revolution and visual composer drag & drop page builder requiring absolutely no coding knowledge. Departments, general organizations, and doctor listings are also featured. Moreover, the convenient Timetable plugin makes an ideal assistant for keeping track of your schedules.
Features List of MediCenter – Responsive Medical WordPress Theme
- Responsive Layout
- Retina Ready
- jQuery Powered
- Build-In Schedule (Timetable) Manager
- Slider Revolution Responsive WordPress Plugin (Value of $26) Included
- WPBakery Page Builder Plugin (Value of $46) Included
- 60+ Page Builder Components Including 20+ Custom Made
- Streamline Premium Icon Font with 105 Icons (Value of $69) Included
- CSS3 Responsive Web Pricing Tables Plugin (Value of $20) Included
- Premium Images (Value of $59) Included
- One-Click Demo Importer
- Theme Options Panel
- WooCommerce Integration
- Smart Sticky Columns
- Theme Color Picker – Unlimited Colors and Color Skins
- Wide and Boxed Layout
- RTL Mode Supported
- Sticky Menu
- Mobile Touch Friendly Slider
- Ajax Contact Form
- Ajax Appointment Form
- Isotope Gallery
- Google Location Map
- 800+ Google Fonts to Choose From
- WPML Compatible. Translation Ready With Mo/Po Files
- Unlimited Menus & Sidebars
- Latest Tweets
- Support for Videos
- PSD Files Included (Don’t hesitate to get in touch with Us to Receive Perfectly Organized PSD Files)
- Documentation Included
- Valid HTML5 Code
- Crossbrowser Compatible
- Pixel Perfect Design
How to Install/Update WordPress Themes/Plugins manually?
Step 1: Buy the Product and download the zip file.
Note: Some Zip files need to be extracted before uploading.
If you are performing an update, install the latest theme/plugin, and WordPress will automatically replace the older version with a newer version. All your settings and customizations will be the same as before, and nothing will be changed.
Step 2: Go to “Appearance > Themes” If it’s a theme or go to the “Plugins” section if it’s a plugin through your WordPress dashboard.

Step 3: Click on “Add New” button (It’s same on themes and plugins section)

Step 4: Click on “Upload Theme” or you’ll show “Upload plugin” on plugin section

Step 5: Click on “Choose file” and select the ZIP file of that theme/plugin

Step 6: Hit “Install now”

Step 7: It’ll take few seconds to Install your wordpress product

Step 8: Once it’s done, click “Activate,” your WordPress product will be installed manually.
How to Install Elementor Template Kits?
Step 1: Download your kit file and do not unzip it.
Step 2: In WordPress, go to Settings > Permalinks and ensure Post Name is selected, then Save
Step 3: Go to Appearance > Themes > Add New and ensure Hello Elementor is installed and activated.
Step 4: The theme activation will prompt you to install and activate the Elementor Page Builder plugin if it is not already installed. Click Install, then Activate.
Step 5: Go to Elementor > Settings, click the Features tab, and ensure Flexbox Container has a green icon (if not, set it to Active).
Step 6: Go to Plugins > Add New and search for “Envato” and Install and Activate the Envato Elements – Photos & Elementor Templates plugin
Note: If your Kit requires Elementor Pro, you must install it before continuing.
Step 7: Go to Elements > Installed Kits and click Upload Template Kit ZIP File. Your templates should appear.
Step 8: Check for the orange banner at the top of the screen and click Install Requirements to load the kit addons and settings.
That’s it, and you’re ready to begin building your site!
- Imported templates are stored in Elementor under Templates > Saved Templates and must be inserted to a new page in WordPress before customizing.
- Imported blocks, tabs, or slides are stored in Elementor under Templates > Saved Templates and may be duplicated and customized directly.
- Elementor Pro site parts are stored in Elementor under Templates > Theme Builder and are customized directly.
Check the in-depth details with screenshots about how to install it here: (Copy the below link and open it in a new tab)
https://help.market.envato.com/hc/en-us/articles/36033428836889-How-to-Upload-Install-Elementor-Template-Kits-from-Themeforest-to-WordPress
How to Install/Update WordPress Themes/Plugins manually?
Step 1: Buy the Product and download the zip file.
Note: Some Zip files need to be extracted before uploading.
If you are performing an update, install the latest theme/plugin, and WordPress will automatically replace the older version with a newer version. All your settings and customizations will be the same as before, and nothing will be changed.
Step 2: Go to “Appearance > Themes” If it’s a theme or go to the “Plugins” section if it’s a plugin through your WordPress dashboard.
Step 3: Click on “Add New” button (It’s same on themes and plugins section)
Step 4: Click on “Upload Theme” or you’ll show “Upload plugin” on plugin section
Step 5: Click on “Choose file” and select the ZIP file of that theme/plugin
Step 6: Hit “Install now”
Step 7: It’ll take few seconds to Install your wordpress product
Step 8: Once it’s done, click “Activate,” your WordPress product will be installed manually.
How to Install Elementor Template Kits?
Step 1: Download your kit file and do not unzip it.
Step 2: In WordPress, go to Settings > Permalinks and ensure Post Name is selected, then Save
Step 3: Go to Appearance > Themes > Add New and ensure Hello Elementor is installed and activated.
Step 4: The theme activation will prompt you to install and activate the Elementor Page Builder plugin if it is not already installed. Click Install, then Activate.
Step 5: Go to Elementor > Settings, click the Features tab, and ensure Flexbox Container has a green icon (if not, set it to Active).
Step 6: Go to Plugins > Add New and search for “Envato” and Install and Activate the Envato Elements – Photos & Elementor Templates plugin
Note: If your Kit requires Elementor Pro, you must install it before continuing.
Step 7: Go to Elements > Installed Kits and click Upload Template Kit ZIP File. Your templates should appear.
Step 8: Check for the orange banner at the top of the screen and click Install Requirements to load the kit addons and settings.
That’s it, and you’re ready to begin building your site!
- Imported templates are stored in Elementor under Templates > Saved Templates and must be inserted to a new page in WordPress before customizing.
- Imported blocks, tabs, or slides are stored in Elementor under Templates > Saved Templates and may be duplicated and customized directly.
- Elementor Pro site parts are stored in Elementor under Templates > Theme Builder and are customized directly.
Check the in-depth details with screenshots about how to install it here: (Copy the below link and open it in a new tab)
https://help.market.envato.com/hc/en-us/articles/36033428836889-How-to-Upload-Install-Elementor-Template-Kits-from-Themeforest-to-WordPress
Only logged in customers who have purchased this product may leave a review.


Reviews
There are no reviews yet.